April in the Garden

  It’s true, the phrase ‘sleep, creep, leap’ when referring to one’s garden growth cycle. Meaning that by the third year of your garden, the ‘leap year’, the perennial plants will come into their own. They grow tall and blossom in a way that they weren’t able to do years prior. The plants, like purple coneflowers, butterfly bush, etc. have all been saving up for this very moment. All good things come in due time, I suppose. I’ve loved watching my garden come alive over the past few weeks. Everything around me seems to be in its ‘leap year.’ 

My relationship with gardening is what inspires my art making practice. I create gardens in the front and back of my house, and on paper with brush strokes and pencil marks. I can capture ephemeral moments from my day-to-day, and place them onto paper, allowing fleeting memories, and glances, to last forever (or so I’d like to hope). My main focus over the past year has been supporting pollinators, including bees, butterflies, and moths with the plants I choose to grow.

I receive joy from observing, drinking in the colors and smells of the flowers, and watching pollinators at work. I enjoy the act of pinching off yellow leaves, of harvesting vegetables, and spreading compost. I do plant edible plants for myself, including cherry tomatoes, spinach (pictured below), romaine lettuce, and rosemary. But my overall goal is to provide nectar, pollen, and host plant resources for pollinators in an urban environment. Gardening is a radical act. It can be done anywhere and any amount of planting is a positive change. Learning how to garden has reconnected me to my ‘urban ecosystem’. I’m not just an observer, I’m a part of something, the way people used to be back when we understood where food came from - before our food became an industry, and before our lives became heavily influenced by consuming.

By tending soil in pots and raised beds, I give back to an environment that is severely lacking in native plants, shade, rainwater control, and so on. A few potted plants can do a lot of good. With all that said, here is a glimpse into my April garden. I’m so glad the world is green again.

My three year old red raspberry bush. I’m harvesting its leaves and turning them into raspberry leaf tea. Bumble bees love visiting its blossoms.

Two different varieties of dahlia seedlings from Growing Floret. I started them from seed back in March. This week, I transitioned them outside and I’ll soon be planting them into raised beds.

My lush spinach plants before harvesting.

Harvesting spinach; my first harvest of 2024. I ate it all within two days.


Feeding the Soul with Drawing

Over the last three months, I’ve been drawing. And that’s it. A long time ago that would have bothered me – but Sam, you must keep painting, because drawings can never be enough. But they are enough.

I feel stripped down, raw, and very aware of my past. I’m thinking about April, when trout season opens up and I’m walking down to the creek at 5 a.m. with my dad. We’re on our way to our spot. We find it and get into our positions, waiting for the sunrise at 7:00 a.m. to cast our first lines. We spend most of the day fishing for rainbow trout and the coveted, creamy white palomino. Lately, I’ve been escaping my present to go back 20 years to my past. I drift off in the middle of my 9 - 5 workday, finding myself at 8 or 9 years old, dancing through the grass, down to the woods and back to the creek. I’m free of the burdens of adult life. I always return from these daydreams feeling nostalgic, wanting to hold on to what I just felt for an eternity. So, I started making my nostalgic daydreams into graphite drawings. 

My finished drawing, Up on the Mountain, 2024.

Getting a lot of inspiration from vintage field guides.

Drawing with my best fur-friend Pickle.

The drawings are small, 8” x 6”, all vertical and drawn with graphite pencils on very sturdy Arches watercolor paper. (Sidebar: I love drawing on hot press Arches watercolor paper! I used it because I didn’t have any drawing paper at the time, and found it to be better suited to graphite and erasing than regular drawing paper). Each drawing expands on my growing iconography, of flowers, bees, butterflies, moons, fish and so on.

The drawings are low stakes. I’ve made 23 so far, with a goal of 32+ by early June (I have a show coming up!!!). I’ve not thrown any away, there were a few that I wanted to, but kept at them. I wanted them to just be, they didn’t need to be labeled with ‘good’ or ‘bad’. So I let them exist, growing a garden of drawings across my studio wall. Each new drawing acts as a puzzle piece, attaching onto the next artwork, making the body of work become whole.

My postcard-sized drawings are as good as my larger plant-based ink and watercolor/collage paintings. Together they fill out my studio practice. Stronger together. I’ve felt for some time that something was missing from my practice. For a few months, I thought it was ceramics, maybe one day, but not for now. Drawing in graphite feels right to me – the way you feel about a lifelong friend or a romantic partner. I can play more with image-making and focus on the little details. I love where the pieces are going, and I’m excited to build a more immersive studio practice. Below are a few images from my studio.

215|610 CONTEMPORARY Juried Exhibition at Delaware County Community College

I’m happy to share that my piece Two Moons was included in the 215 | 610 CONTEMPORARY Juried Exhibition of Regional Emerging Artists, juried by Mark Thomas Gibson, Artist and Educator, Tyler School of Art + Architecture, Temple University.

About the Exhibition:

The Gallery at Delaware County Community College presents the annual 215|610 CONTEMPORARY Juried Exhibition, featuring the work of 34 regional emerging artists living and working in and around the Philadelphia region. The 2023 exhibition will be on view in the College Art Gallery November 13–December 15, and is juried by artist and educator Mark Thomas Gibson. The purpose of this juried exhibition is to showcase local emerging contemporary artists, create a platform for critical discourse through an exchange of ideas, and to push the boundaries of an age-old practice. On Tuesday, November 28 beginning at 4 p.m., the exhibition’s juror Mark Thomas Gibson will lecture on his personal work and practice. This Juror’s Talk is open to the public and free to attend.

2023 Featured Artists:

Jill Adler, Christen Baker, Molly Burt-Westvig, Soso Capaldi, Kyle Choy, Meghan Cox, Zoraye Cyrus, Carmel Dor, Chad Cortez Everett, Mia Fabrizio, Olivia Fredricks, Nicolo Gentile, Riley Gosnell, Theodore Harris, James Heimer, Stephanie Manzi, Caitlin McCormack, Paolo Mentasti, Desiree Morales, Dale Parson, Kaitlin Pomerantz, Taj Poscé, Amira Pualwan, Arshayla Robinson, Libby Rosa, Samantha Sanders, Jonathan Santoro, Morgan Shankweiler, Madeleine Speicher-Willis, Sean Starowitz, Jacob Stevens, Hester Stinnett, Maria Stracke, and Misha Wyllie.

Being an Artist in Residence at Oak Spring Garden Foundation

I feel very fortunate to say that I’ve been an artist in residence at Oak Spring Garden Foundation (OSGF), not once, not twice, but three times now! Oak Spring Garden Foundation is a very special place for me and for so many other people. This residency program has been apart of my life for nearly five years. It saw me through so many transitions in my creative and personal life, and I’m so happy to share about how it’s informed my art making practice!

The first time I was an artist in residence at OSGF, was for six-weeks in April through May, 2019. I had the pleasure of watching 750 acres of relatively untouched rural Virginia landscape transition from winter into spring. At that moment in my life, everything was new. My studio apartment, my two hourly part-time jobs, and my relationship with my current boyfriend. During my first residency, I made dozens of small oil paintings (I no longer oil paint now - ha!), and I spent hours upon hours each day walking, biking, and immersing myself in grasslands, woodlands and the formal gardens of OSGF. The Foundation was just getting up and running and in many ways, so was I, as a post-college artist. I had no idea where my studio practice was going and it stressed me out beyond belief. Reflecting back on it, I’m glad I didn’t have it all figured out then, at the naive age of 25. Through the struggle and discomfort I found my way forward.

My first studio space at Oak Spring. This is six weeks worth of oil paintings and a few works on paper.

A series of 12” x 9” paintings that were inspired by watching spring unfold across Oak Spring.

I returned to OSGF for a one week alumni artist residency in late October 2020. It was a COVID-19 impacted residency. I lived alone and worked alone 24/7, for seven days. I welcomed the solitude and space to create. I was also thrilled to see how much OSGF had changed in 1 1/2 years since my last residency. They had a paper making and dye garden, a working farm with a CSA program, and the horse pastures were now very young biodiverse grasslands and meadows. During my days, I collected withering dye garden plants, black walnuts and other materials on the property to make into ink for when I returned home. Even though this residency was short, it was incredibly productive. I made drawings using black walnut ink that I had recently taught myself how to forage for and make. I used my time to observe fall transitioning into winter and embraced the quiet time to reflect on what I really wanted to make. I developed works over the course of that week that became the foundation for what my current art practice is now - both conceptually and physically. I left on day seven feeling like a new person.

A series of mixed media works on paper that all include black walnut ink and other handmade inks.

My main focus was drawing with handmade ink and slowly introducing color. I wanted to capture the essence of fall with each piece.

Which brings me to the present day. I returned to OSGF for a third time for a two-week alumni artist residency in July 2023. Nearly three years since my second residency and over 4 1/2 since my first residency, I was back again to make a new body of work.

My focus for the two weeks was to make art that explored native Northeastern pollinators and their host plants. Similar to my previous residencies, I spent most of the days outside, wandering through grasslands, meadows and gardens watching pollinators (bees, butterflies, beetles, moths etc.) engage with flowers and plants. I found the best place to observe pollinators, in the new Rokeby Habitat Garden. I would visit it in the mornings and in the early evenings each day. I was eye-level with wild bergamot and purple coneflowers. The flowers shimmered at sunset and hummed with hundreds if not thousands of busy bees. I studied the plants, curious to see what insects relied on them as a nectar source. I felt very much at peace here, seeing pollination in its greatest form.

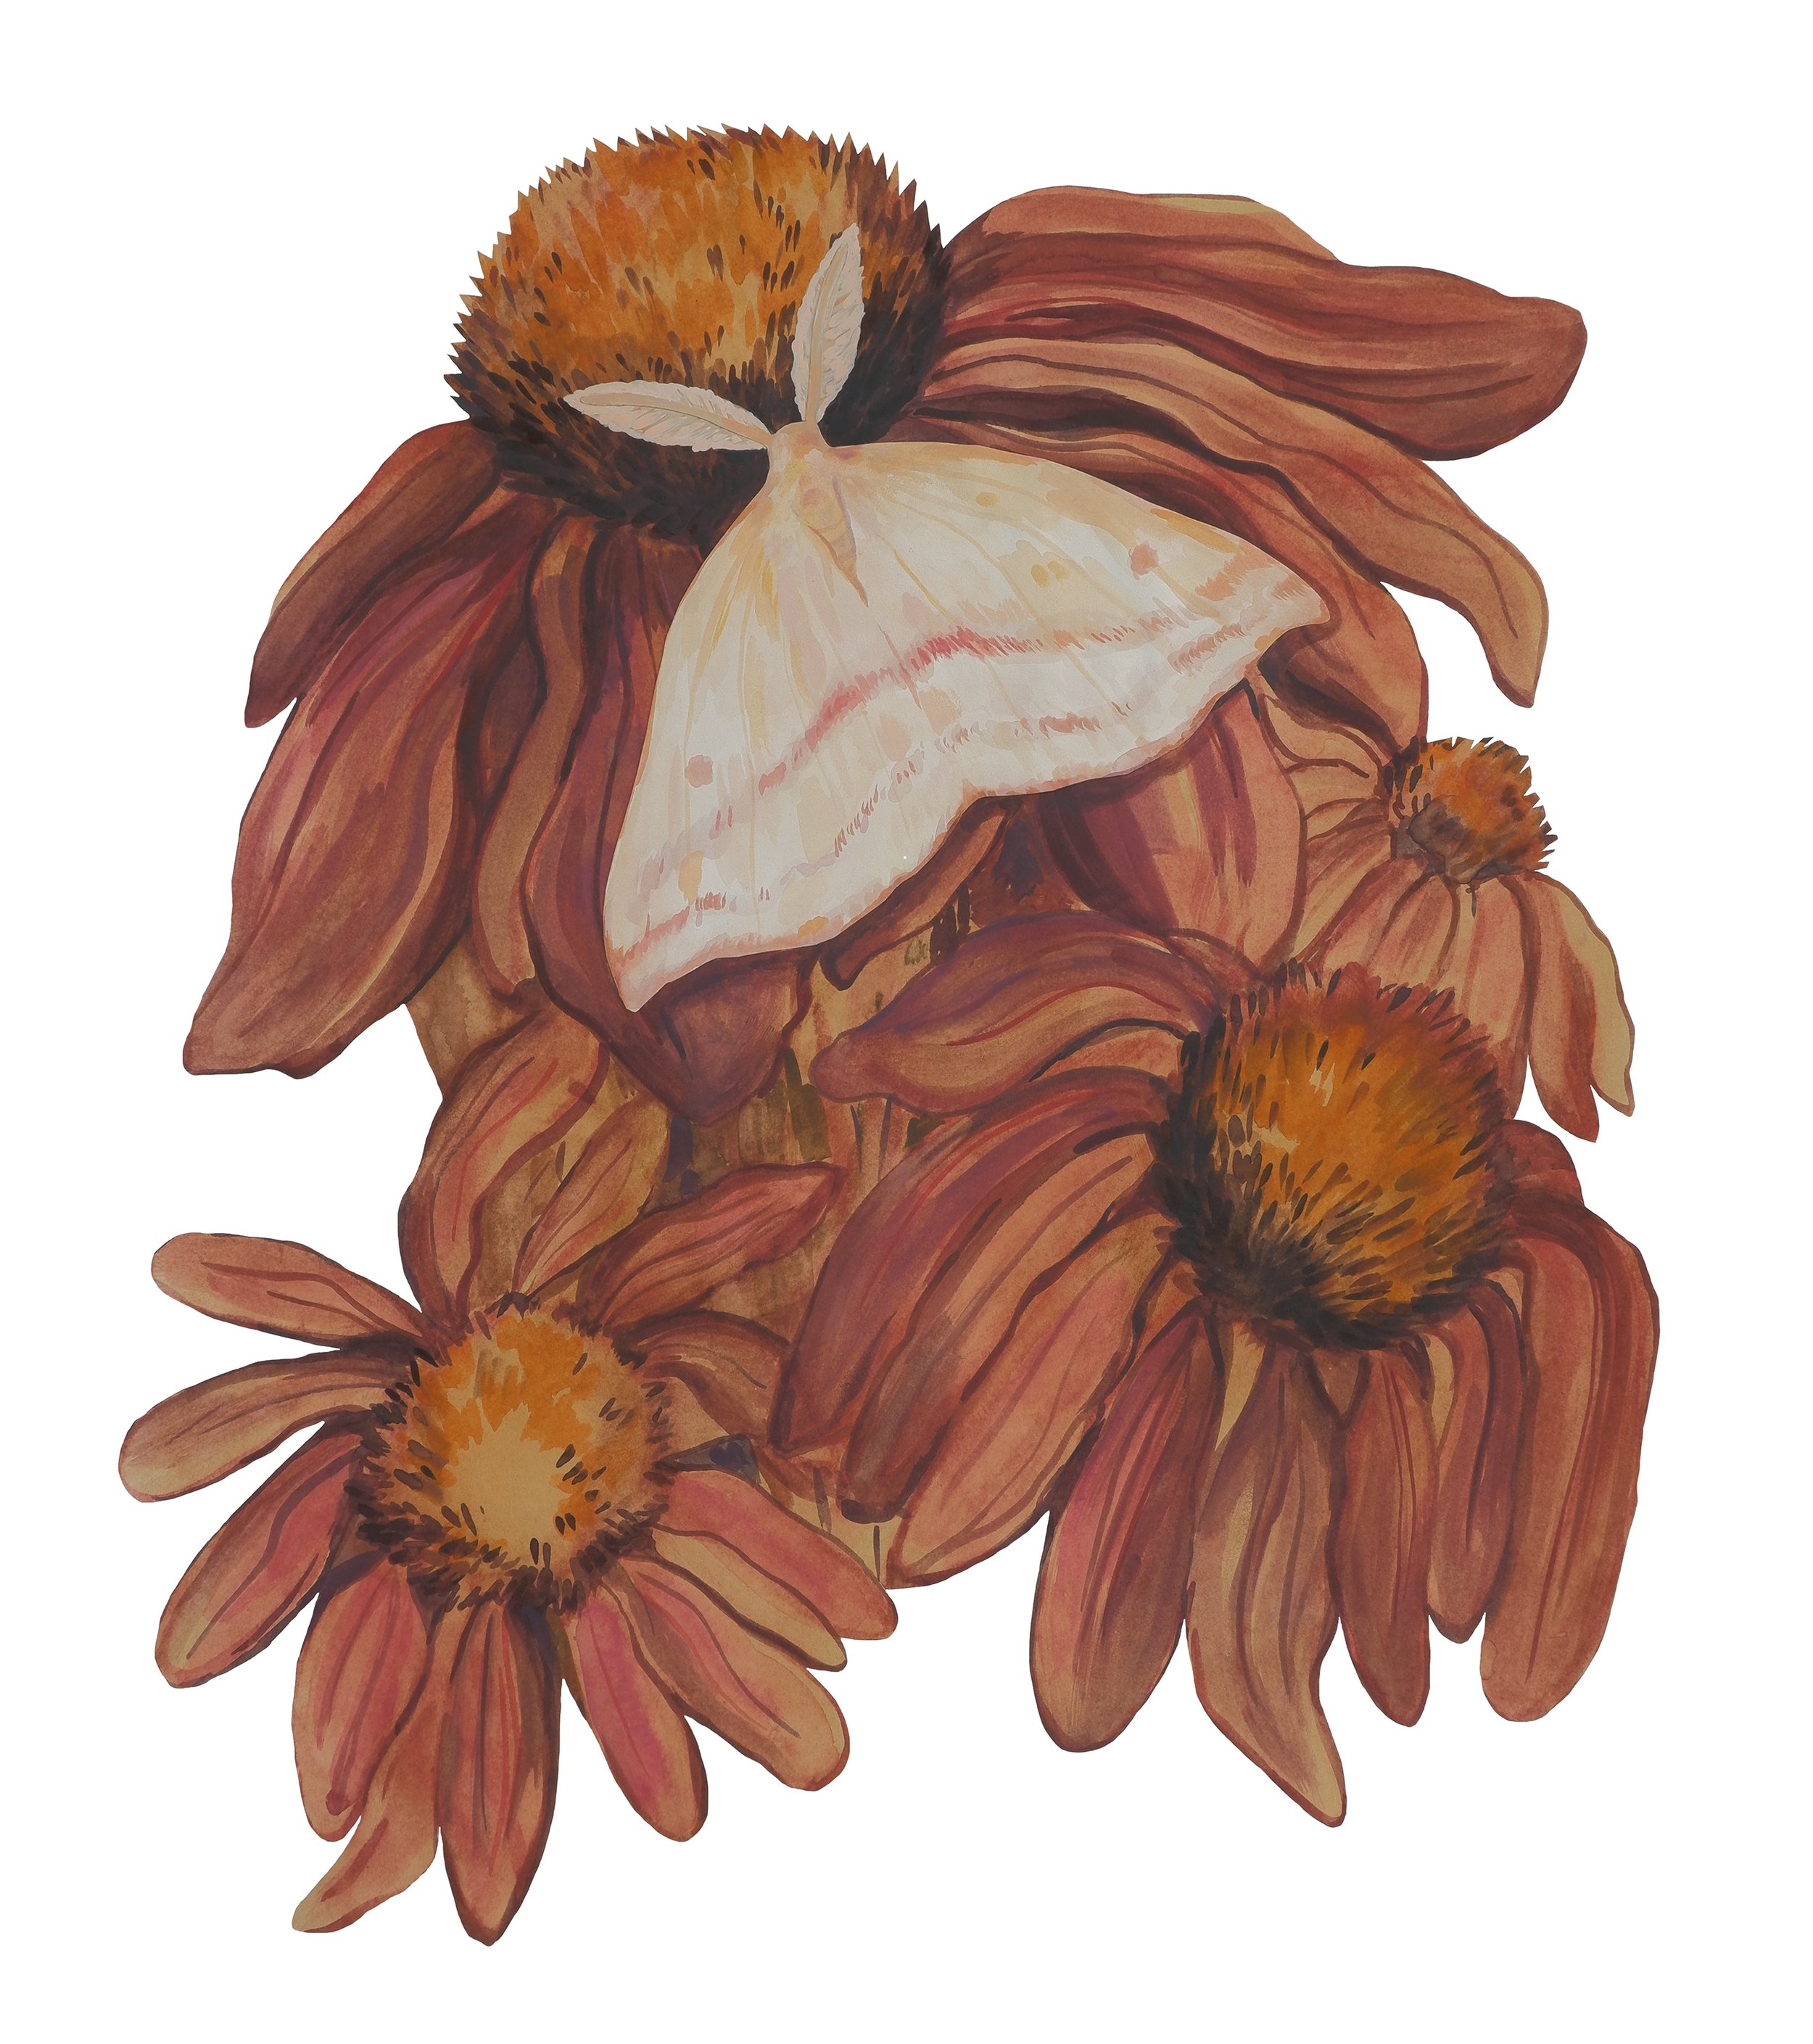
I loved the purple coneflowers so much that I made a painting about them, Pollinators Delight (pictured below). The moth collaged on top of the coneflowers is a chickweed geometer moth. I spotted it resting on a blade of dewy grass beside my studio one morning. It’s about the size of a nickel in real life (pictured below). The yellows in the piece are the last of the goldenrod flower ink that I made back in August 2022. I love that the foundation of my painting about flowers is made from actual flowers. I really enjoyed focusing on making large cut-out pieces. I’m no stranger to breaking the rectangle and I pushed that style further.

Purple coneflowers in all their glory!

Purple coneflowers with a skipper butterfly stopping by for some sweet, sweet nectar.

Chickweed geometer moth on a blade of grass.

Pollinators Delight, 2023, goldenrod flower ink, all-natural gouache and collage on paper, 27” x 22 1/2.”

I walked miles and miles of cut paths through grasslands daily, filled with gold finches, red-winged black birds, crows, white tailed deer; red foxes, swallowtail and monarch butterflies (many were spotted mating!) and so many other species of insects and animals. It was just me and them for the most part, in a sea of grass as tall as myself. At every turn I was presented with a new animal or plant to surprise and delight me.

I would occasionally hear a plane overhead or a car on the road, otherwise, the world sounded wild and went unbothered by people (besides me and a few others scurrying about). I found the grassland spaces to be incredibly inspiring. It’s very rare to find natural spaces that aren’t mowed lawns, farm fields or woodlands back home in Pennsylvania. It’s no surprise that grassland species are the fastest declining species in North America, due to mankind’s desire for empty green lawns, monoculture farmlands, urban sprawl and so on. Untouched nature is hard to find these days.

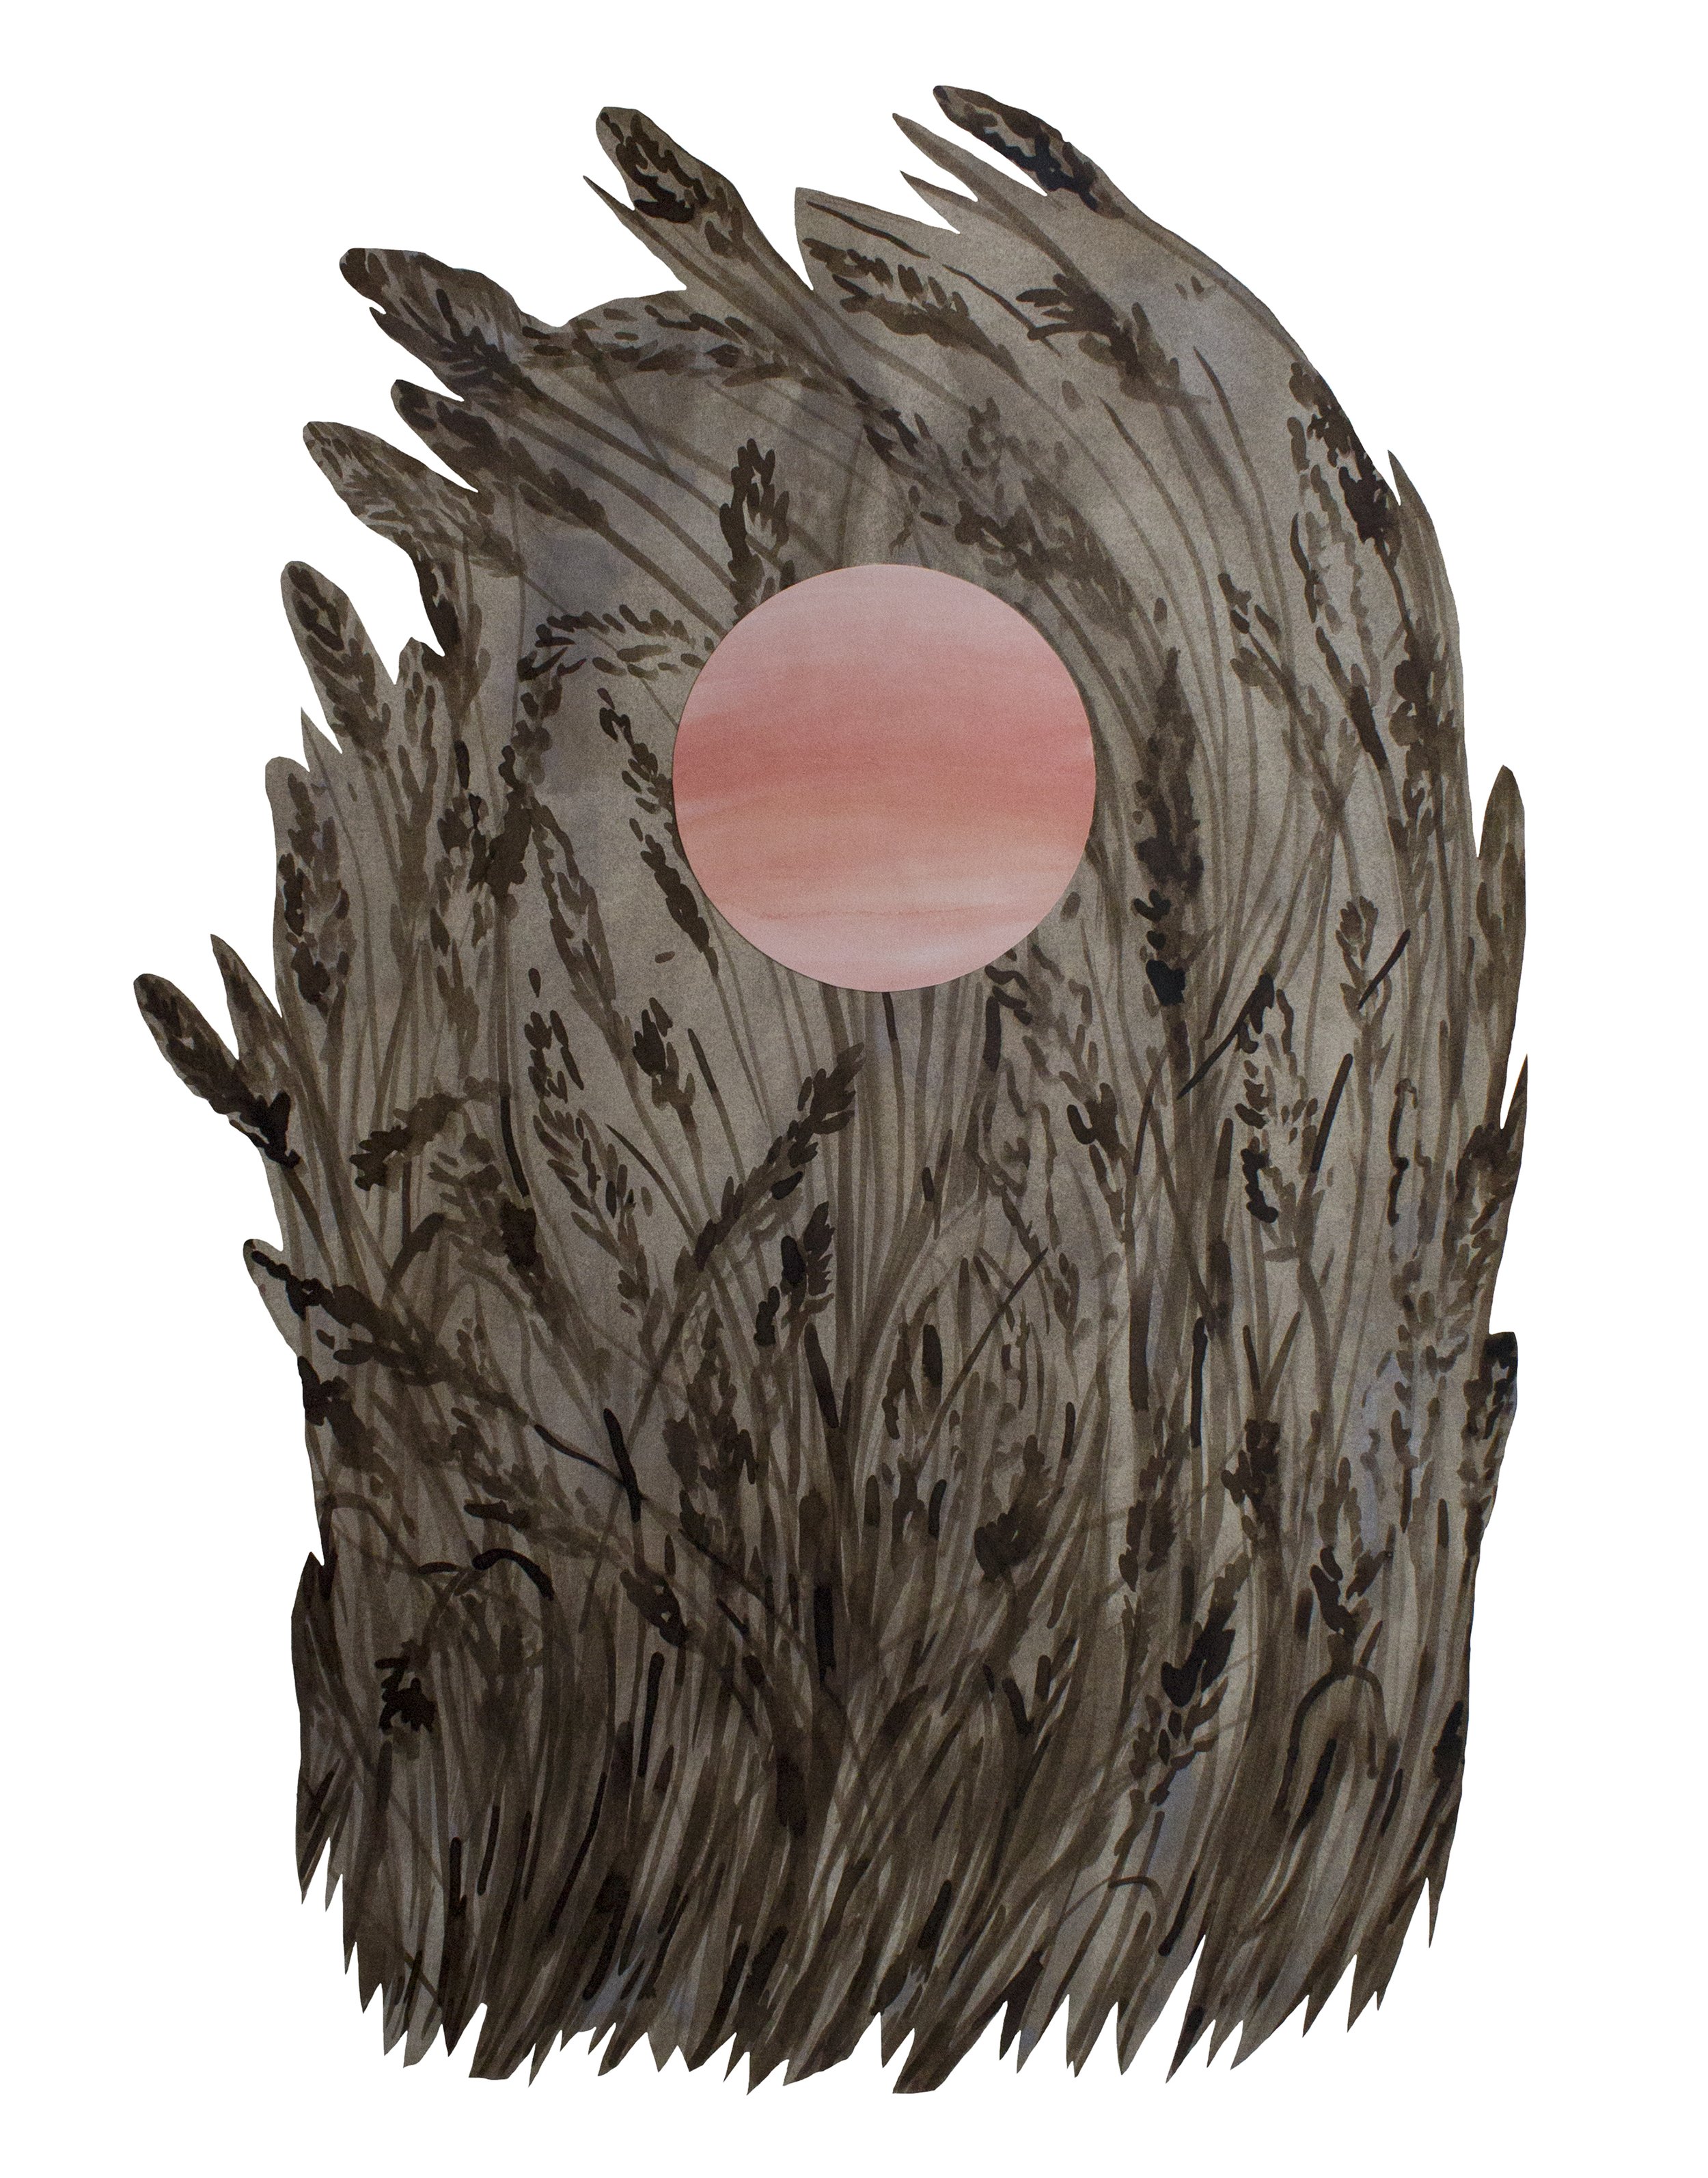
Grasslands are as alive and biodiverse as forests or oceans if they’re allowed to be. My hours spent in the tall grass inspired the piece below, Being Present in the Grasslands. Made with mostly black walnut ink (grass) and all-natural gouache (purples washes and the collaged on red sun), it reflects the lushness of the tall grass I experienced. I originally wanted to cover it in collaged bugs that I saw during my days, but I found the simplicity of the grass to be more profound on its own. After all, when you approach tall grass, it just looks like grass - unless you pause and look closer. There were a few nights with unbelievably deep red-orange, fiery-like sunsets. Those sunsets live on as the centerpiece in Being Present in the Grasslands and in two other smaller pieces that I’m currently working on.

Walking through the grasslands.

Another glorious sunset!

One of the deep, red-orange sunsets that I was very lucky to witness during an evening bike ride.

A work in progress image of Being Present in the Grasslands. I originally wanted to collage on bugs, like the dogbane leaf beetles that you can see taped onto the paper in the image.

Being Present in the Grasslands, 2023, black walnut ink, all-natural gouache and collage on paper, 29” x 19.”

As I wrap things up, I want to take a moment to appreciate the best part of my residency: the time spent with other artists, chefs, scientists, gardeners, farmers, scholars, writers, biologists etc. I met SO MANY wonderful people this past July. Being able to spend time amongst others who love the land as deeply as I do, and seeing them reflect that back into their work is an immense privilege and honor.

A dogbane leaf beetle on a dogbane plant. This rainbow jewel of a bug was one of best surprises of my residency.

A big, beautiful monarch butterfly caterpillar! I spent hours everyday observing insects. Someone even asked me if I was an entomologist (a bug scientist)!

I took this photo of sunflowers in the dye garden on the last night of my residency. It was a very bittersweet night.

Me working in the studio. Housemate and fellow artist Maddison Colvin took this photo.


My inclusion in the MEPAINTSME 2023 Open Call

I’m excited and humbled to share that my piece Underneath the Blood Moon has been included in the MEPAINTSME 2023 Open Call, which is an international online exhibition. Myself and 49 other talented artists from around the world are included in this exhibition. I’m also happy to share that my piece sold! Proceeds from the sale go directly to organizations working to end gun violence in the United States. Here’s more about the online exhibition:

“The MEPAINTSME annual Open Call exhibition provides a venue for emerging, non-professional, and established artists, alike. With selection based entirely on the stand-alone merits of the work, it presents an equal opportunity to every artist who applies. Altogether, I was deeply moved by the caliber of work submitted for this year's open call, and am pleased to present this selection of artworks by 50 international artists from 16 countries. With this effort, I also wanted to give artists and collectors the ability to support non-profit groups whose mission was in line with my own. Last year, the 2022 Open Call exhibition raised over $5,000 to support Ukrainian Relief efforts.  This year, mepaintsme will be donating 100% of profits form the sale of artwork to support organizations dedicated to non-violence, including Sandy Hook PromiseHealing Hurt People, Everytown for Gun Safety, and Giffords Law Center. These organizations have excellent violence prevention programming — each using education, research and advocacy to fulfill their respective missions, with a few programs aimed towards electing candidates who are committed to finding solutions to this growing epidemic.”

Being included in exhibitions like this always reminds me that being an artist isn’t a binary experience. It’s fluid: each day, month, year looks different from the last. Some are better than others. Most of my time is spent working a full-time job that pays my bills and allows me the space to create and exist outside of the constant stress and worry about surviving. Artist’s can exist in many shapes and forms. Making is what makes YOU, you! As long as you do so, you’re an artist in my book. I always need to remind myself of that, when most of my time is spent on other things besides art. As long as you’re true to yourself and dreaming up what comes next, you’re succeeding. Selling and showing artworks does not equal success. Showing and selling is great, but it’s not always consistent. It also hinges on art = profit. If every part of your life is about consuming or being consumed, you’re just another cog in the capitalist wheel. Success is what you make of life - it’s on YOUR terms. Be kind to yourself and life will work with you instead of against you - most of the time.

Anyway, I’ll miss this painting a lot. She’s a beauty, and it was made out of a place of peace, calm and love. I hope these little butterflies and moths end up somewhere that loves them. Whatever you do, keep making artwork that’s true to you, and apply to things that make sense for your work; and do not throw in the towel when rejection and hardship come your way. Making art is about the long-term - it’s a lifelong journey. I hope my words bring you the peace of mind I could have used 5 years ago.

Welcoming in Spring

I love March. It’s the last month of winter and the first month of spring – spring being my favorite season! In March I start my garden and I also turn a year older - cheers to 29! It’s when I begin to open-up all the windows in the house (even when it’s chilly), and I get overly excited by bird song in the mornings. Speaking of birds, thousands if not millions of birds are migrating back up North right now. Tundra swans, snow geese, winter wrens, canvasbacks and more are on the move. You can look into who is migrating in your area here: https://birdcast.info/ – I’ve been admiring the large v-formations of Canadian geese flying over Philadelphia lately. I love that you can hear their loud “honks” from high-above the city.

I started some garden seeds indoors last week and a few of the seeds are now just starting to sprout, like my Rembrandt snapdragons. Each day I check-on my collection of little planters, anticipating who's next to come up! Maybe my tomato seeds (gifted from Oak Spring Garden Foundation) will be next, or my shishito peppers, who knows?! While in the midst of preparing my garden, I’m slowing down in the studio. 

Winter was busy, far too busy for me… Balancing a full-time job and an art career is not easy. As much as I love teaching, showing, and talking about my artwork, it’s hard to juggle my 9-5 with all of my art activities. Plus, my full-time job requires a lot of creative energy in its own right. On the cusp of 29, I’ve decided it’s finally time to hit pause and take the rest of 2023 in slow, methodical strides. I’m taking a break from the rat-race. Which doesn’t mean I’m not making art, but I’m making in a way that’s kinder to my mind and body. 

As an artist, you always want to say yes – because if you don’t say yes to an art opportunity it might not ever present itself again. Right now, besides a two-week long residency planned for July, I have nothing scheduled for the rest of the year. Each day is what I make of it. I’m not scheming, I’m not creating mile-long open call lists, I’m not stressing over how many pieces I should make this year, this month, this week etc. I’m existing and moving at my own pace. I’m finding balance – balance is the word I’m living by in 2023! It’s a pace that’s not defined by the art world or by capitalism – I’m making art because I want to and need to. Because it’s what makes my life whole. 

So here’s what I’ve been up-to: I built a paper-making studio in late-February, mostly out of repurposed items. I needed a large tub, for holding paper pulp and water. I repurposed a red plastic drawer, that was once part of a toy container from my childhood. I made a mould and deckle from two store-bought wooden stretchers (rest in peace AC MOORE, you were good to me) and some leftover garden mesh. The paper pulp is made from paper scraps that I’ve been collecting since late-2018 (that’s 5 years worth of paper scraps!). I processed my paper scraps into paper-pulp using a second-hand food processor.

My paper making studio is based in my unfinished, 100-year old basement. As you can see in the images below, it’s not a beautiful place but it works! Paper making is something you can do just about anywhere! I’m excited to continue working on different pulp mixtures. In time, I’ll be incorporating plant-based dyes/inks into the coloring of the paper and maybe even plant-materials themselves. For now, I’m admiring the 12 sheets of paper I made last weekend. Soon they’ll find their way into new works on paper…

Making a mould and deckle (frame and screen) with various tools, repurposed stretcher bars and leftover garden mesh. I sealed the wood with shellac.

A repurposed plastic drawer, now a large tub for holding water and paper pulp.

A freshly pulled sheet of paper resting on the deckle.

Freshly processed paper pulp sitting next to a bag of paper scraps.

Pulling sheets of paper with the mould and deckle from the pulp and water mixture.

Finished and dried sheets of handmade paper!

How to Make Black Walnut Ink

My absolute favorite ink to make and to use is black walnut ink! The eastern black walnut tree is native to North America. Black walnut trees are primarily used as a resource for lumber. The nuts are my favorite ink resource – and a food resource for a variety of species. People can also eat the “nut meat” of black walnuts. I’ve never tried it but maybe one day I will!

Every October, I set out to collect at least two large bagfuls of black walnuts from my parents’ house. August through November is when black walnut trees drop their fruit. Their green tennis ball-like fruits ripen on the tree and then drop to the forest floor with a loud thud. That’s when I compete with the resident squirrels to collect them - and not to worry, once I make my ink, I discard the walnut shells back into nature. No additives are used while I make my inks. That only happens after they are jarred. This is my recipe on how to make a jar of rich, dark brown black walnut ink.

FORAGING and PLANT MATERIALS

  1. Collect your black walnuts when they’re turning brown or fully brown. In their green stage, they’re not going to make great ink. That’s why I prefer to forage in October. I love walking through the woods in October, you can hear the creak and thud of black walnuts dropping to the ground – and beware! – getting hit in the head by a falling black walnut is painful! 

  2. Collect at least 16 - 24 black walnuts in a plastic bag or cloth bag. Plastic is awful and I avoid using it as much as I can, but it’s helpful in this process (you can rinse the bag when you're through with it and save it for next year's black walnut hull). Black walnuts will stain just about anything so be mindful where you place them! With ink making, it’s best practice to have more plant material than less. Aim for at least 24 black walnuts to have the best ink outcome. 

  3. I recommend leaving your bag of nuts in the freezer for a week or longer. It will kill off any bugs living inside the black walnuts. It will also assist in turning green nuts into brown nuts. By freezing them, you will also prevent mold from forming. 

SUPPLIES

  • A large, deep stainless steel pot or aluminum pot (used for dye/ink making ONLY do not use your cookware)

  • 1 - 3 Medium or Large mason jars to store the ink in 

  • 1 Additional Medium or Large mason jar to assist in filtering your ink

  • 2 Large plastic bags (or cloth) to collect and store the black walnuts

  • 1 small and 1 large metal spoon, a small metal strainer, a handful of paper coffee filters and a few rubber bands 

  • 6 - 10 cups of filtered, cold water (more or less water depending on how much ink you want/add more water if the ink reduces too much)

  • Clove buds or wintergreen oil to add as a preservative (purchase at Whole Foods or other grocery stores)

  • 5 - 10 strips of paper to test ink color on as you process it

  • Gum Arabic powder or liquid, to use as a binder (you don’t really need a binder for black walnut ink. The tannins in the walnuts fix the color to the liquid naturally). You can use Gum Arabic as a thickener.

  • Iron power (optional) if you plan to use a mordant to darken your ink

PROCESS

  1. Fill-up your stainless steel/aluminum pot with the preferred amount of water. Remember, as the ink simmers it will evaporate water. Too much water will make the ink less opaque. Find a happy medium by experimentation. My method: 16 - 24 black walnuts + 6 - 8 cups of water = 1 - 2 medium or 1 large mason jars’ worth of dark brown ink. 

  2. Bring your water to a simmer on the stove (10 -15 minutes).

  3. Once the water is simmering, turn your heat to the medium heat setting and add in your black walnuts.

  4. With the lid on, slightly cracked, let the black walnuts heat slowly in the water and simmer/boil. Turn the heat down if the ink begins to boil too much. A bubbly simmer is ideal. If it’s too hot the water will evaporate very quickly. 

  5. Ideally, let the black walnuts process for between 4 - 8 hours before turning the heat completely off. 2 - 3 hours of medium heat processing and another 2 - 4 hours of low heat processing is ideal for breaking down the nuts. This helps make the color richer. Stir and check on your ink pot every 30 - 45 minutes. Safety Reminder: Do not leave your home with the burners on! You can always restart your ink if you need to step away. It takes me two days sometimes to process my black walnut ink if I’m not home for a full day. 

  6. Around the 2-3 hour mark, take one of your paper strips and dip it into the ink, testing the color quality. If the test strip is light, increase the heat of your ink and continue to process it for at another 2+ hours. If you have little ink water left, add more in. Test again around hour 4. Continue to process and test every hour until the color is dark brown.

  7. Once your ink is cooled down after 4 - 8 hours of processing, mash up your black walnuts. Let your black walnuts sit overnight in the pot (for at least 12 more hours or longer if you’d like). The ink will continue to darken overnight. The mashed up plant materials will help increase the pigment particles in the water, making for a better ink consistency. 

  8. The next day, scoop out the black walnut shells and discard them outside if you can or toss them in your compost bin! Squirrels will eat your leftover black walnut shells. Ink making for me is about honoring the earth and incorporating it into my artwork both conceptually and physically. You’re not respecting the earth by adding your black walnuts to a landfill. 

  9. Place a coffee filter over the mouth of your mason jar, with a rubber band securing it. You want to strain as much plant material out of the liquid. This usually takes at least two-three strains to accomplish. I prefer to set my mason jar over a paper towel/cloth on my kitchen table. I pour the ink slowly over top of the coffee filter and let it strain for about 20-30 minutes at a time – by that point the coffee filter should be free of liquid. You’ll need to replace your coffee filters as you go, a fresh filter speeds up the straining process and creates less mess in the longer run. Do this at least twice, by straining into one jar as you pour from the other.

  10. Once the black walnut ink is filtered well, pour it into the unused mason jars that you had set aside. Add 3 - 5 drops of wintergreen oil or 3 - 5 clove buds to help preserve the ink. Keep in mind that the ink is alive, it can grow mold. I regularly check on my ink jars every few months to make sure that they’re in good shape. If you notice mold growing on top of the ink, scoop it out with a spoon or paper towel then add more drops of wintergreen oil or add new clove buds. I recommend re-jarring your inks once a year. 

  11. I recommend adding in 1 - 2 scoops of gum arabic powder or several drops of the liquid. The powder takes some effort to mix into the ink. Feel free to shake the jar. Use your small spoon to mix in the gum arabic until you no longer have large white clumps. Some residue is fine. Mixing can take around 10 - 20 minutes or so. It’s a great hand workout!

  12. It’s modifier time! (Optional) Add a few sprinkles of iron power into your black walnut ink to sadden your color, making it darker. Iron is a mordant that helps adhere dyes to surfaces. It also affects the color of a dye/ink. Iron will darken the black walnut ink, making it almost black. If you want a very deep, dark black walnut ink it’s best to add. 

  13. Label your ink (Name/Month/Year/Mordant if used) and add it to your ink collection! I like to create an ink swatch at this time, on a spare piece of watercolor paper. I write down the same label details and brush ink across the paper. I add the swatch to my archive, to remember all the different types of ink I’ve made.

Swatches of all the black walnut inks I've made over the last five years.

Examples of artworks made with black walnut ink only. See more artworks on my 2024 Paintings page.

Sustainable Studios

I’m happy to share that I am one of four artists included in the exhibition Sustainable Studios. The exhibition opens to the public on Thursday, February 2nd, with an opening reception at 6 p.m. I have nine works on paper included in the exhibition. In conjunction with the exhibition, I will be teaching an Ink Making with Foraged Materials workshop on Tuesday, February 14th at Millersville University.

Sustainable Studios

Curated by Heidi Leitzke, February 2 - May 5, 2023

Nichole van Beek, Silas McDonough, Jill Good and Samantha Sanders

The artists featured in Sustainable Studios provide various models for how artists and concerned citizens can pursue solutions towards climate resiliency in their studio practices and daily lives. Exploring a range of media including bio based inks, reclaimed textile quilts, mushroom foam wall relief, salvaged material sculptures, and more, these works of art embrace creativity and are representative of the positive actions we can take now to fight for our imperiled earth.

One of our goals with this project is to encourage curiosity, asking Millersville University students and artists/makers from Lancaster City and County to consider the sustainability of their studio practices. We encourage people to consider the following questions as they explore the exhibition and participate in our special events.

  • What does sustainability mean for artists and makers?

  • What is a sustainable material or art-making process?

  • Does this work of art need to last forever… or could I consider a biodegradable alternate?

  • How can artists create space for conversations about challenging topics in our community?

Solo Show: Of the Earth

Happy New Year! I’m pleased to announce my first university solo show: Of the Earth opening at Holy Family University Art Gallery on January 18th through February 15th. I had so much fun putting this exhibition together! You can read more about it below. Please stop by and check it out if you’re in the Philadelphia area — and cheers to a happy and healthy 2023!

PRESS RELEASE

Holy Family University Art Gallery is pleased to present Of the Earth, a solo exhibition of recent works on paper by Philadelphia-based artist Samantha Sanders. Sanders’ works incorporate plant-based inks that she’s foraged and made with all-natural watercolor and collage. She explores themes of grief, environmental fragility, and her rural Pennsylvania upbringing. 

The piece Of the Earth, which the exhibition is titled after, marks the beginning of Sanders' use of plant-based pigments. The exhibition was developed over the last two years, and each piece includes inks made from black walnuts, hickory nuts, goldenrod flowers and food waste, such as onion skins and avocado pits/skins. Sanders honors the land with her inks, marrying material with subject matter. She draws inspiration from the local wildlife that wander through her South Philly back-patio, like the opossum in As the Days Grow Shorter, and the pigeon in A Friendly Neighbor. A Glimpse Into My Garden captures a summer of first-time urban gardening for Sanders. A green pepper and cherry tomatoes emerge from a fiery orange background, representing abundant growth, while a bold dark-brown butterfly is in flight. Butterflies are a recurring icon in Sanders’ works. Concerned with the environmental threats pollinators face, Sanders calls attention to pollinators and their food sources. Don’t Let the Milkweed Die explores the relationship of the Monarch caterpillar and the milkweed plant; milkweed being the caterpillars' only food source. Monarch butterflies were recently listed as an Endangered Species, mainly due to habitat loss.

Crescent moons appear in Sanders' work, acting as an indicator of time and a source of light in the darkness. The works intermingle on the wall, unframed and exposed, creating an ecosystem all their own. Icons and motifs found in Pennsylvania German folk art punctuate much of Sanders’ works on paper. The butterflies in An Ode to Summer are inspired by the butterfly that can be found in the Birth and baptismal certificate for Elizabeth Sechler, d. 1820, which is included in the permanent collection at the Philadelphia Museum of Art. Abstracted vegetal portals in Earth in My Hands, Of the Earth and After Midnight explore Sanders’ spiritual side. Trying to connect with those she’s lost, the portals bridge the gap between the world of the living and dead. Fish act as spirits, moving between worlds. Lamenting for lost loved ones and for the state of the natural world, Sanders’ painting practice holds onto hope, without forgetting the pain that comes with life as it moves forward.

Of the Earth asks the viewer to reflect on their relationship to the natural world around them. How can we enact positive environmental change in our homes, cities and backyards? Our neighbors are more than people; they are the plants and animals that share space with us daily. Sanders’ represents the reciprocal relationship between humankind and the environment through her painting practice, in hopes that the animals and plants she depicts will be here long after she’s gone.

Thoughts, Feelings and Exciting News

As I write this, the first heat wave of the summer is almost at its end. Every morning I go to the garden, after I feed the cats and make an iced coffee. I enjoy that it's 78 degrees at 7:30am instead of 90. Regardless of the temperature, I visit my patio garden morning, noon and night. It’s hard to believe that the growing season is halfway over. I’ve learned a lot from my garden this summer, and the lessons learned have run parallel with my studio practice. 

Lesson 1: Trial and Error 

Some combinations work and some don’t. The soil in one of my planter boxes was weak and did not allow for any drainage, causing my plants to drown. I mixed a compost bag into the soil and it's improved since, but it’s not as nutrient rich as my other planter boxes’s soil combination. Sometimes when you think you’re doing things right, you’re actually wrong. “Practice makes better, because nothing’s perfect,” said a very wise school teacher I once had. 

Lesson 2: Humility

Gardening makes you humble quickly. For example, I grew my cherry tomatoes from seeds into four-foot tall adult plants. I am incredibly proud and attached to my cherry tomatoes. They were lush and leafy and then, suddenly, a fungus started yellowing and killing off the leaves. I had to act fast to ensure that the top half of the plant would survive. To ensure its survival, I cut back over half of its leaves. Which worked, my tomato plants fruits are now ripening. Too much water + humidity = tomato fungus. Nature has its own plan and you have to learn to work with it. 

Lesson 3: Patience 

I started my garden in early April, by preparing the soil in my planter boxes and containers. Three months later, my garden is just now starting to yield vegetables. Everyday I prune, water, and add or remove shade, in the hopes that what I’m growing yields an edible crop. So much of my day-to-day is taking notice of the small changes and achievements. I notice and appreciate that my raspberry bush is sending up new stalks because it’s getting the right amount of shade/water, I notice honey bees visiting my flowering mint plants (which doesn’t happen often, unfortunately) and I notice each day, that my two pepper plants are continuing to produce new peppers. Every little moment makes the big moments twice as worthwhile.

Cherry Tomatoes that are ripening.

My time in the garden has made me acutely aware of the importance of pollinators. They come in all different shapes, sizes and species. Without them we’re doomed because our food sources are dependent upon pollination. Monarch butterflies are now listed as an endangered species (see NY Times article), mainly due to pesticide use on American farms and habitat loss across North and South America. Monarchs lay their eggs exclusively on milkweed plants. Without milkweed, monarchs can’t produce the next generation of butterflies, which is leading to their rapid decline. This news really upset me, so I’m doing my part by educating myself on what I can do in my own garden to support urban pollinators. Below are four books I bought second-hand, that I’ll be reading and responding to - in the garden and in the studio.

And finally, on a happier note: I was offered a solo show at Holy Family University, opening in January 2023! I am beyond excited and thankful for this opportunity. The plight of the monarch butterfly and the advocacy for other species of plants and animals will be the core concept of the exhibition. I’m currently in the ideas stage: reading, writing, sketching and reflecting. Below are a few works on paper that I recently started. I can’t wait to see where things are headed!

Bud (our new kitten!) and Pickle checking out a new collage. I’m reusing older works on paper in this one.

A few other small works on paper that I started. I prefer to work on 2-3 small pieces at a time.

To Plant a Garden

Life’s busy right now and my time in the studio is sparse. I accepted a new job position last week, which means my days are filled with constant to-dos. I’m wrapping things up where I currently work as I’m preparing for my new role. In my down time I’ve been reading and gardening to relax myself. I recently finished A Year of Magical Thinking by the late and great Joan Didion. If you’ve experienced loss, I highly recommend this read. Grief is the guiding force behind my studio practice. Didion’s words opened up my soul and warmed it. Her grief echoed my own. I can still hear her voice in my head. It feels good to be reading consistently again. Up next: finishing Braiding SweetGrass by scientist and Indigenous author Robin Wall Kimmerer.

Besides preparing for my new job and reading, I’ve been eagerly developing my patio garden. The beginnings of this garden started nearly a year ago when Alex and I moved into our shared apartment. I spent the summer/fall of 2021 preparing my home on the inside but not on the outside. I started to visualize what I wanted my urban garden to be during the winter months. I knew come summer 2022, that I wanted to be growing things - things to eat and things to admire! Being connected to nature is so important to me, both mentally and physically. It feeds my soul, it keeps my hands busy and it fuels my creative practice. In the words of my father “there is nothing better than the taste of a home-grown tomato.”

I prepared the garden soil in late-April. I filled the planter boxes that I built in December, which were gifts from my parents with a mixture of soil and compost (from Bennett Compost). I started Brussels sprouts and cherry tomato seeds indoors, which are now outside. I directly sowed catnip, kale, lettuce, native Northeastern wildflowers and clover into my planter boxes. Throughout May, I planted established strawberries, peppermint, snap-dragons, a raspberry bush, marigolds, pansies and johnny-jump-ups, petunias, two kinds of pepper plants; French lavender, morning glories, basil, cilantro and rosemary. Over the weekend I added a butterfly bush to the collection, hoping to lure more pollinators to my garden.

In the evenings I put Pickle in his harness and we “go to the garden.” He bird/bug watches as I inspect my plants for new growth or pests. Shortly after I planted my raspberry bush, a tiny caterpillar nibbled holes in the majority of its leaves. While I was trying to figure out how to stop the little bug, I noticed a wasp hunting on the leaves one sunny afternoon. The wasp comes daily now and new raspberry leaves are sprouting. Nature is a wondrous thing. A few days ago at sunset, I painted my petunias from life with my black walnut ink, which are now part of Summertime Toad. It felt wonderful to be connected to the world around me. Every morning and every night, I tend to my plants and I thank them for what they’re doing. My soul feels so full.

The garden.

Pickle enjoying the plants.

My first morning glory bloom.

August Abandonment

In the late-summer of 2019, as I was walking along the Schuylkill River in Fairmount Park, the idea of August Abandonment came to me. The two words encapsulated the feeling of change – the shifting of time – that often goes unnoticed most days, which was spurred on by summer fading into fall. My evening walks were becoming chillier. Heat stroked tulip poplar trees were dropping their leaves in abundance. The world appeared more golden than green with every passing moment. My acuteness to the world around me started to find itself in the art I was making. Over the next two years, I taught myself how to make inks from foraged plant materials, I learned more about the plants and animals that are native to Pennsylvania and explored entirely new ways of image making. I kept the words August Abandonment written down in a sketchbook, hoping to return to them eventually, when the time was right — and that time is now!

My mini solo show titled August Abandonment opens at Sabbatical Beauty on Friday, May 6th - June 3rd in the Bok Building. Curated by my friend Megan Wirick, this collection of artworks encompasses two years of grief, reflection and anxiety that has weaved through my everyday life. The eight works included in the exhibition contain iconography that is representative of the people and places that I hold dear. Dogwoods by the River and Dead Nettle Moon speak to spring, when the world begins to flower and green again. Icons like the fish in Trout Season and the butterfly in You’re Always with Me, represent memories of lost loved ones. My works dance between the past and present -  which is why Fraktur Portal #4 and Fraktur Portal #6 exist. Inspired by PA German Folk Art (my late grandmother was PA German), these vegetal portals connect the world of the living to the spiritual. 


A portion of the proceeds will be donated to ACCT Philly.

Failure, Success and Collage

I’ve gone back and forth with using collage in my works on paper practice for years. I love adding and subtracting. I love that no piece is too precious - that a painting can have endless outcomes. More recently, I tend to use collage when a piece isn’t working as a whole. Collaging is how I address failure in my work. Failure leads to innovation and unexpected outcomes. It keeps me on my toes. I usually work on three pieces at a time, and when one starts to fail, I consider ways to cover up what’s not working or change the piece altogether. I rarely start a work on paper with collaged elements in mind. Collaging comes as an organic response to the frustrations of developing a painting. It almost always presents itself very late in the process, when I feel my most uninspired or lost. Collaging revitalizes what I’m making and it often elevates the piece to a place where I never imagined it could go.

Below is a work on paper piece Two Moons that had several different variations before arriving at the final image. It demonstrates how my work often starts out in one direction but ends up somewhere completely different. I will also note: my works on paper happen in the moment. I do not plan out in advance the colors, marks and textures I end up using. I am responding to everything that’s happening on the page. I usually have a few icons in mind and the piece develops from there. The final outcome is always a surprise. 

*Pickle my cat, the best studio assistant around.

The Importance of Iconography


Iconography: 

the visual images and symbols used in a work of art or the study or interpretation of these.

My life’s story is defined by specific icons that appear in my works on paper and oil paintings. Butterflies, PA German Folk Art, garden tools, moons, and other flora and fauna are emblematic of loved ones, places and memories that I immortalize through painting, collaging and drawing. I will also note, that the majority of the pigments I make my works out of come from places I’ve known and hold dear to me.

I started working at the Philadelphia Museum of Art in the summer of 2018, which introduced me to their robust collection of PA German Folk Art for the first time. Works on paper, furniture and ceramics covered in motifs of birds, flowers, and animals became a source of inspiration for me. My paternal grandmother - the only grandparent I was able to know - was PA German. I’ll share more about her one day. It took me 25 years to realize how these objects and images could give me access to my familial history, and how to honor the land and the people I love best. A few of my icons and their meanings are listed below. I found writing about each icon to be incredibly insightful.


CRESCENT MOON:

Mother

My Mom always brings up the moon when we text or talk over the phone. If there’s a full moon, a pink moon or a super moon, you better believe I know about it. We share the same moon in our separate places, and the moon collapses the distance between us. The moon appears in PA German Folk as a signifier of the seasons.

Equal to the sun, the moon moves life forward. 

BUTTERFLY:

Father

Since I could remember, my Dad has always loved butterflies. His garden shed is covered in ceramic and metal decorations of all sorts. Pin-wheeled butterflies spin in the flowerbeds alongside my parents house every summer. As a child, my dad, niece and grandmother would help me collect dead monarch butterfly wings, next to her butterfly bush. They would fall prey to praying mantises. Their yellow and orange wings would be my treasures.

The butterfly is the pollinator and life-bringer. 

TROUT and CREEK

Harry 

My second father; the neighbor across the street. The most tragic loss in my life. 

Harry loved to swim. In my childhood summers, I would run down to the creek with my niece Sarah to find Harry diving off of the singing bridge into the water. He would float above the trout, minnows and crayfish. He would disappear in and out of the sunlight and the tree shade as he paddled alongside the current. I would like to think the creek and its inhabitants remember him as I do.

Fish act as spirits in my work.

SUNFLOWER

Earth - Myself

A sunflower is hard to miss. They are abundant with life. They die beautifully, after every single seed is given back to the earth. The sunflower is me. It is the mother and the daughter. It blossoms and burns. It is the anxiety I feel every single day about the state of the world.

It is the hope of better days and the life I hope to bring forth in due time.  


The Magic of Foraging Season

Fall is my favorite time of year. I love change. I love when the crickets’ nightly trill begins at the end of August. I love when leaves turn from green to bright yellows and rustit reds. I love that nature encourages its last flowers to bloom, my favorite being the tall and magnificent purple aster. What I love most about Fall these days is that it is time to forage, for nuts and flowers to grow my ink collection. In September, goldenrod flowers bloom in fields and along roadways. Their lush, yellow flowers make for a great yellow ink. Hickory trees and walnut trees start dropping their nuts. I compete with squirrels while collecting them, starting in October and through to the end of November. Hickory nuts make an excellent light brown ink. Black walnuts make a rich, deep brown ink. If you add a mordant like iron to your hickory nut ink or black walnut ink you get a darker pigment. Black walnut ink with iron in it can turn the ink black. I’ve had all kinds of ink color variations in my studio these past three years, as I’ve foraged and made inks from various flowers, nuts and berries. I’ve had many failures and many successes. Those successes can be found in all of my works on paper pieces. 

I’ve been making inks now for three falls. I started my ink making and foraging journey in Fall 2019. I first collected goldenrod flowers in Wissahickon Valley Park and made a small batch of ink out of them. I’ve held onto a small vial of that goldenrod ink. It’s a deep yellow ink that I use sparingly. It’s a physical representation of a new beginning for me. Each ink I make represents the place it is from. It’s both a tool and memento. The pigment is a vessel for a memory. I forage for plant matter in the city and outside of the city. You can find ink worthy plants everywhere. Foraging and inkmaking is a magical process and an intimate, personal process, that I love sharing with others. My connection to nature has grown deeper these last three years. Making my own paint is empowering. It also is cost effective. Each ink is not like the other, making my painting practice feel just a little more special. For example, the black walnuts I collect from my parents house make a rich, warm brown. Black walnuts I’ve gathered from other areas (Northern PA and Virginia) have been different shades of brown, some cool, some ashy, some lighter and some darker. The below images are from recent 2021 foraging trips.

Top Left: Black Walnuts / Bottom Left: Hickory Nuts / Right: Goldenrod Flower

Shaghorn Hickory Nuts foraged in New Jersey, October 2021.

Manada Creek Black Walnut Ink, October 2021

Ink swatch of Manada Creek Black Walnut Ink, October 2021

Limitations and Art Making

I’m writing this while tired, overworked and slightly overwhelmed. Bear with me. 

These feelings directly relate to balancing a full-time job, teaching one art class a week and making artwork in my studio… while finding time to see my family, and connecting with my boyfriend and my friends. I’ve learned over the past three months that one can definitely wish for more hours in the day but that wish can not ever be granted. Why on earth am I trying to sleep for 7 hours when I could spend 3 of those hours painting or drawing? Oh wait, I need to be able to function as a healthy human being. This manic feeling happens weekly, when I realize I need a few more hours to paint or prepare to teach or to simply sit down, breathe and do NOTHING. Finding a moment to do nothing is what keeps me going these days. I usually find that moment between 6 AM and 7 AM, before I need to eat and get dressed for work. I also find that moment around 8 PM to 11 PM when I’m sitting in my studio alone reflecting on my oil paintings and works on paper. If I can, I paint during this time or I simply sit and appreciate my art.

Being able to make art is a passion and it is also a privilege. 

I find sharing about my struggle as a working artist and a working professional to be cathartic and hopefully, if you’re reading this, relatable. I want more artists to share about this struggle. I want to sit in on more artists' talks or artist panels that don’t sugarcoat the struggle of balancing a full-time job and an art career. Because it’s NOT EASY. Making a living, paying my bills and student loans is important to me. I also love having healthcare. Working part-time or not at all isn’t something I can do, which a lot of artists seem to be able to do. I like having set hours and dental insurance. What I don’t like is not having the energy to paint after 6:30 PM on a Tuesday.

You can’t have it all, obviously. 

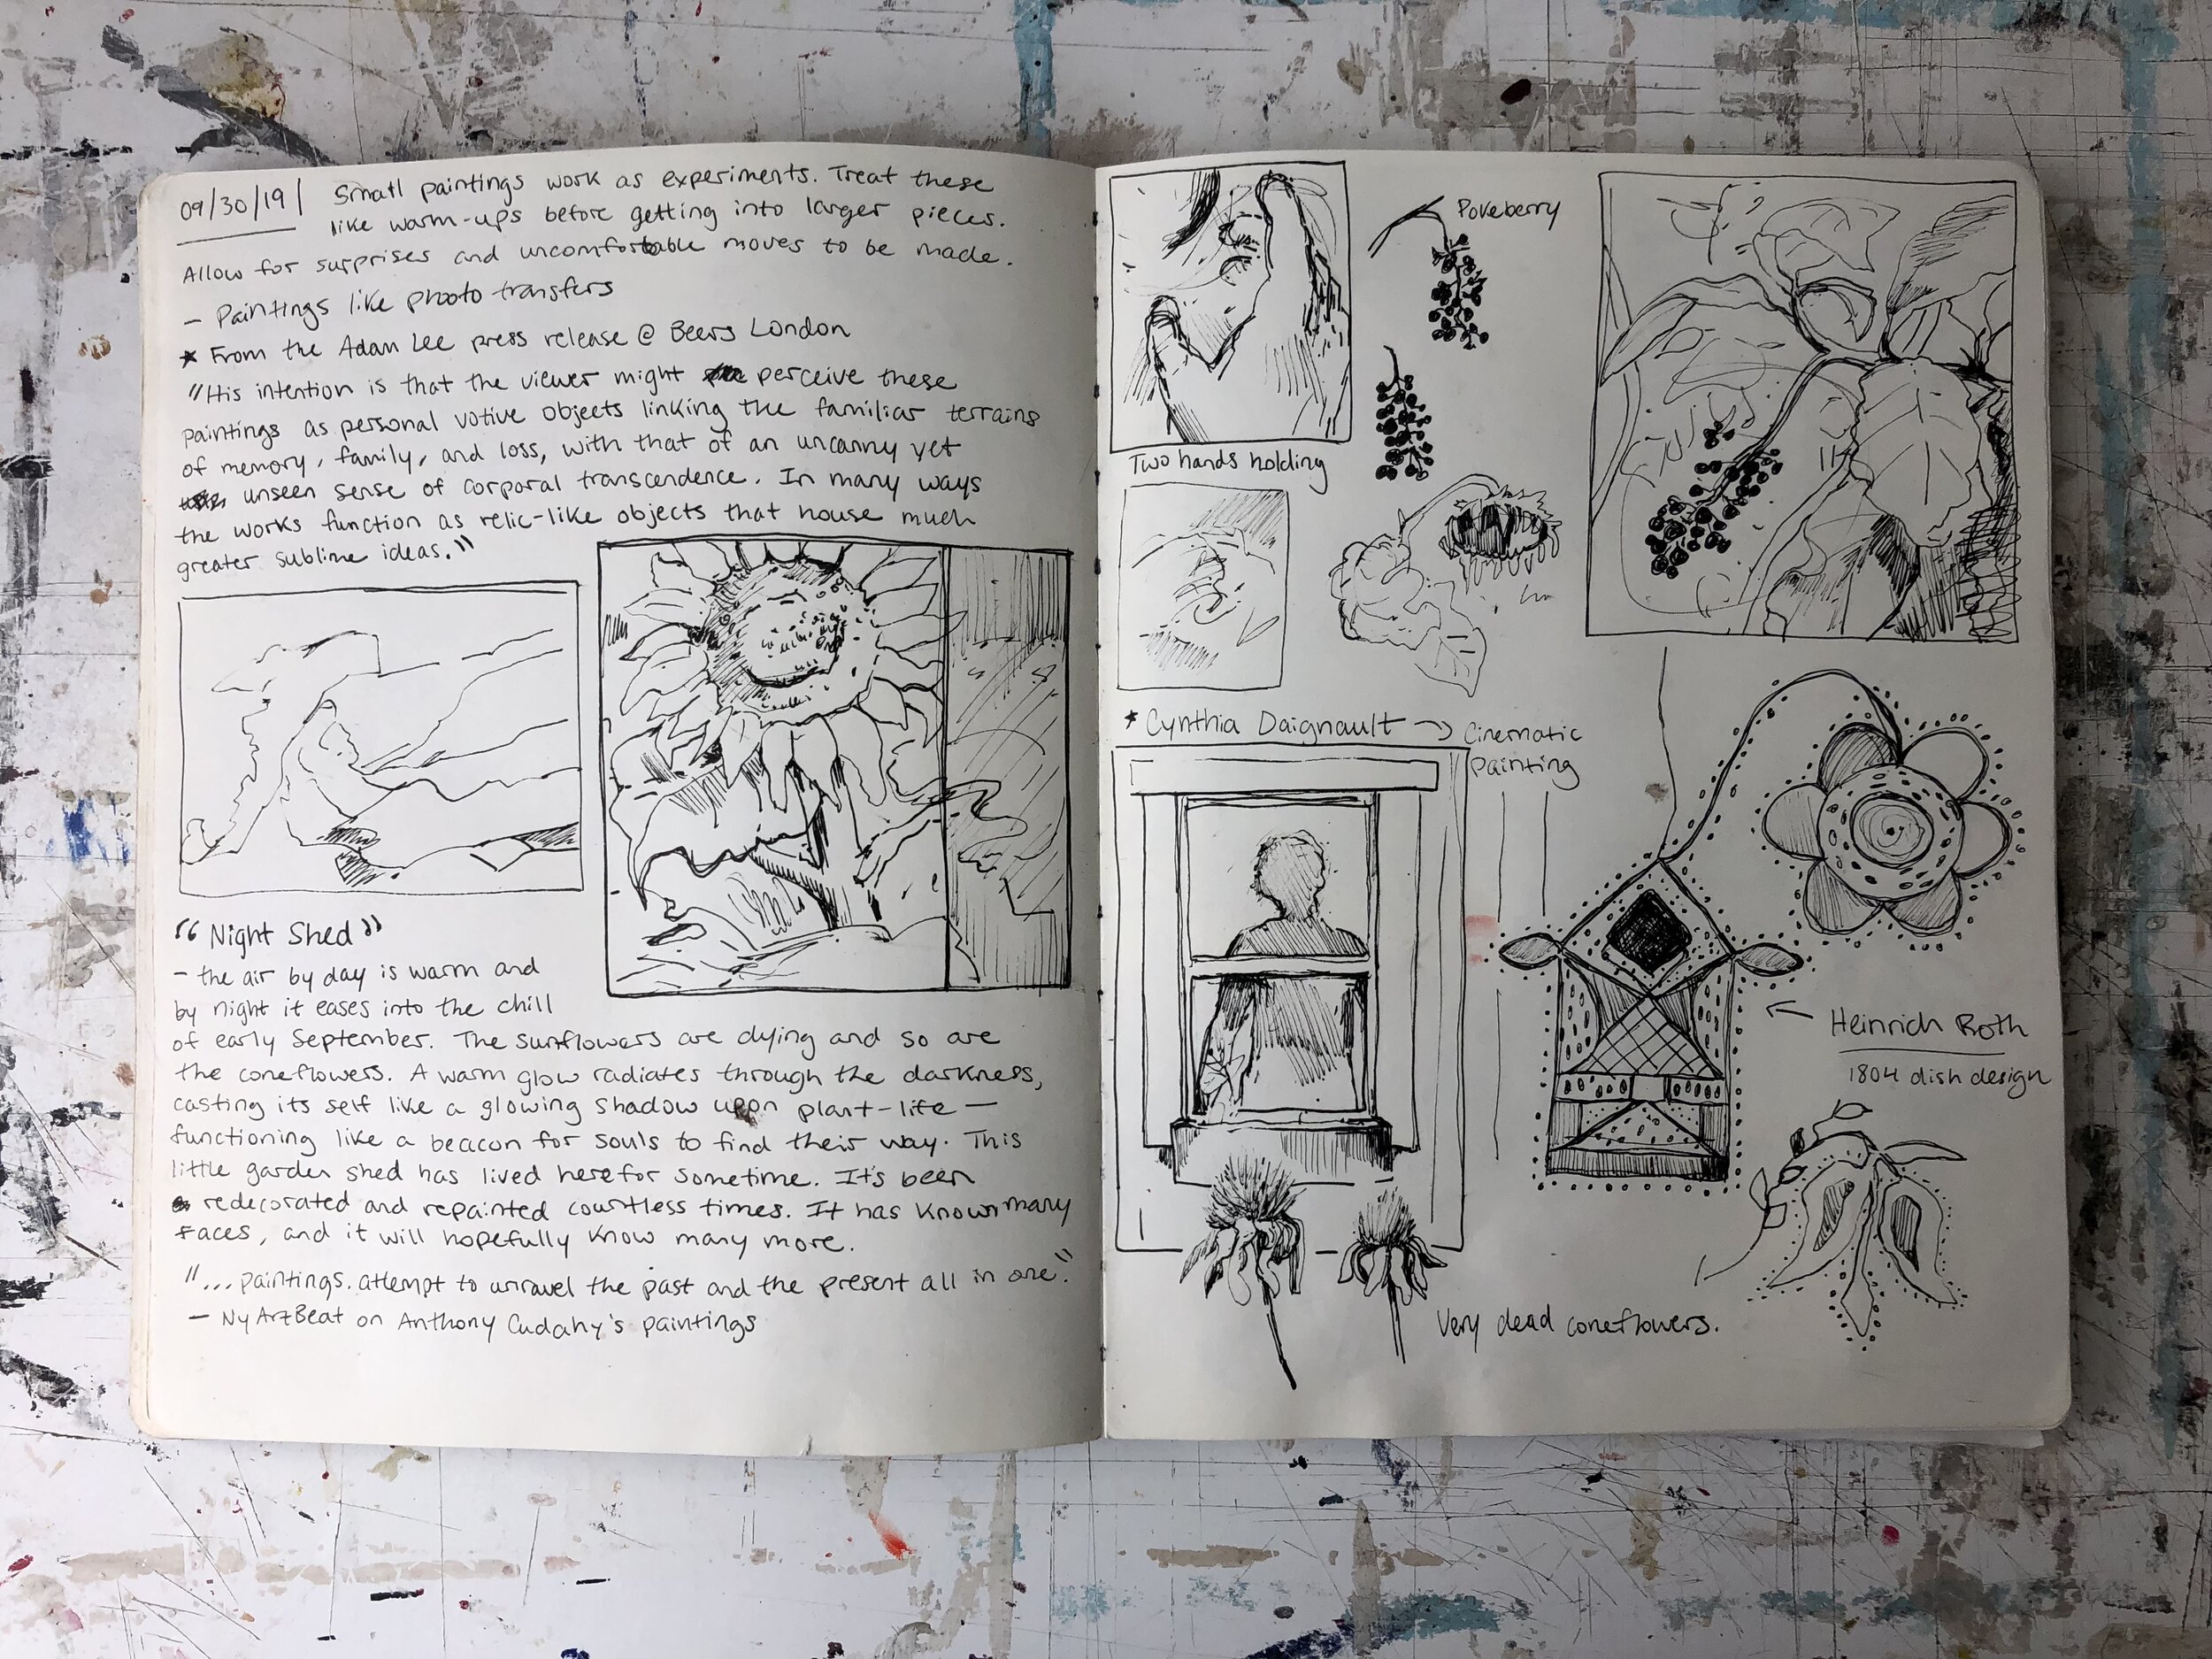
That brings me to my steadfast lifeline. My sketchbook has become a lifeline of sorts over the past few years. I started aggressively making notes and weekly sketches while working at my previous job. If there was a moment of silence, a slow period or a lunch break, I made the effort to disappear into my mind and pour my thoughts and ideas out onto the page. It kept me focused, it kept me inspired and it kept me from breaking down (most of the time). My sketchbook is my best friend. It’s where my past lives and my present all at the same time. It’s an object that I carry, look back on and look forward to using. It’s my best advice to anyone who struggles to make art - during school, after school or in general. 

As I sit here and decompress through my writing, I want to share images from my sketchbook. My sketchbook and looking at artworks in-person has kept me going these past three years, as I’ve struggled to know what to make art about or to even make something in general. If you’re in a long-term slump or frustrated this week about something that you’re working on, take some time to write or draw or to go see a gallery or museum show. It will help you, I promise. 

Somedays are better than others. And that’s okay. Just keep at it.


A Return to Oil Painting

Whenever I think of an example of a love hate relationship, my mind automatically goes to oil painting. As an artist who identifies as a painter above all other mediums and interests, one would assume oil painting is my Holy Grail -- but sometimes one’s greatest passion in life is their biggest frustration. Oil painting is definity mine. I wanted to write about my feelings towards painting because after three years of on-and-off again oil painting - I’ve got my groove back! 

Oil painting doesn’t feel like a stranger to me anymore. I’ve found oil painting to be a constant struggle since graduating from my MFA program in 2018. It’s taken countless hours, dozens of stretched, gessoed, then painted on and eventually fully destroyed canvases to reach the point I’m currently at. I’m working on three medium-sized oil paintings right now. I spend a few hours on each piece per week, building up the imagery and color on each paintings’ surface slowly - patience is key here! I started a new full-time job, which means my studio time is limited most days. Having a (real) studio for the first time in three years has helped me a lot in my return to painting. My painting studio is no longer 3 feet away from my bed -- it’s a separate room now! I’ve also spent the last year making A LOT of works on paper and developing an entirely new painting language. I kept oil painting at a distance as I found conceptual direction again while working on small works on paper pieces. I made dozens of paper works and after some time questioning if I even wanted to be an oil painter anymore, I got back into the swing of things in late 2020 after my Alumni Residency at Oak Spring Garden Foundation.

I made the piece “Past Lives” (2020, 30” x 24” oil on canvas) (Below Image) at the end of 2020 when I was feeling like an oil painter again. There were at least 3-4 different paintings on this canvas before the final image happened. It took months to realize. It was both a breakthrough and a roadblock for me. It was the first painting in three years that “felt right” to me but I couldn’t figure out how to keep that momentum going. Nearly a year later, I’m finally working on pieces that speak to this painting and expand on it. Needless to say, I owe a lot to this painting and am happy to share it’s on view at The Pennsylvania College of Art and Design till October 31st! https://pcad.edu/gallery/

Past Lives.jpg

       I will also mention the burden social media plays on the creative practice. Lacking studio space is a physical hindrance but a mental hindrance is seeing what feels like dozens of artists my age and a bit older having streamlined, effortless studio practices. When I scroll through Instagram I am often confronted by artists who regularly post their new, completed and cohesive paintings. They seem to crank one out after the next without a struggle. Meanwhile, it took me a full year to make one good painting and another full year to start making a few more paintings. I have spent far too much time comparing my studio practice to others’. I’m training my brain to do that less these days and appreciate my slow growth more. Because growth, no matter how small is the end goal for me. One good painting day is better then not painting at all. Having three paintings that are at the starting point of a new body of work is an achievement, and should be celebrated. Loving painting again is about trusting myself again and refocusing my goals realistically as a maker, who teaches and works a 9-5 job. And with that, I say: cheers to the struggles, the breakthroughs and all the new possibilities!

Below are a few in-progress images from my August 2021 studio:


Image #5.JPG
Image #2.jpg

How to Make Avocado and Onion Ink

I first started making foraged plant-based inks in September 2019. I went foraging for the first time with my boyfriend in the Wissahickon Valley Park, where I collected goldenrod flowers. Goldenrod flowers make for a beautiful bright, yellow ink. Ink making, which is similar to dyeing, requires plant material, a large pot and a few jars; hot water and a few other simple, affordable ingredients to make. It can take hours or days to process, which is all dependent on what color/plant you’re working with. One of the easiest ways to get into making plant-based ink for the first time, is to collect avocado pits/skins and onion skins. Your food waste becomes ink to paint with! Below is my recipe for making avocado and onion ink, with a few additional tips on how to get different color variations.


PLANT MATERIALS

  • 10-15 avocado pits 

  • Avocado skins (2) per avocado

  • 5 onions worth of skins (orange or yellow or both) 

  • All these materials + 6-8 cups of water = 1 full medium mason jar (usually)

When I lived alone, it took me around 10-12 weeks to come up with that amount of food waste. Store your food waste in a plastic bag or a container and don’t worry if it gets a bit moldy. Wash the mold and debris off of your plant waste when you are ready to make ink.

Avocado pits make a pink/red color when used alone.

Avocado skins make an orange/tan color when used alone. 

Onion skins (orange and yellow) make a yellow or orange color.

When the avocado pits and skins are combined (my preferred method), they make a warm yellow or light orange color. The color can also vary depending on how long you simmer your ink for, and if you choose to use a mordant/modifier or not. Using mordants and modifiers can really enhance your ink color. Note, if you cook any of the above on high heat for too long you get brown!

What’s a mordant or modifier? A mordant is iron, alum, tannin (found in nuts), or copper etc. These elements (usually natural metal salts) adhere your dye/ink to your paper or fabric, and they also change the chemical makeup of the dye/ink while you’re making it. I prefer to add mordants to my inks once they’re done processing during the jarring phase. Mordants and modifiers, like citric acid, baking soda and washing soda change the pH level in the water, transforming the color. Alum in avocado and onion ink makes the ink brighter (almost highlighter-yellow). Washing soda in avocado and onion ink makes it a deep, red-orange. If you add iron to avocado and onion ink it saddens the ink, making it turn darker, usually an earthy brown. I recommend using alum or washing soda for interesting color effects. By leaving the ink entirely additive free, it usually comes out as a medium to bold pink/orange color.

SUPPLIES

  • Alum powder (optional; it’s toxic, wear a mask when using and keep away from the face/eyes)

  • Washing soda powder (optional; keep away from face/eyes)

  • A large, deep stainless steel pot or aluminum pot (used for dye/ink making ONLY. Do not use your cookware!)

  • 1-2 Medium or Large mason jars

  • 1 additional mason jar to assist with filtering the ink 

  • 1 Large and 1 Small metal spoon

  • Small metal funnel set, paper coffee filters, a face mask and a few rubber bands

  • 6-8 cups of filtered cold water (add more if the ink reduces too much)

  • Clove buds or wintergreen oil to add as a preservative

  • 5-10 strips of paper to test ink on while processing and after

  • Gum Arabic in powder or liquid form, to use as a binder. You don’t really need a binder for avocado and onion ink. The tannins in the avocados help fix the color to the liquid. You can use Gum Arabic as a thickener.

PROCESS

  1. Fill-up your stainless steel pot with water. Remember, as the ink simmers it will evaporate water. Too much water will make the ink transparent. Find a happy medium by experimentation. Add more water as needed. 

  2. Bring your water to a simmer on the stove (10-15 minutes).

  3. Once the water is simmering, turn your heat to the lowest setting and add in your plant materials. Place the lid on top with a crack to let out some heat.

  4. Let the plant materials heat slowly in the water for 30-45 minutes. Stir every 10-15 minutes. The longer the color cooks, the richer it will become. Your ink should be a rich pink/tan color in the pot. Use the paper strips to test the potency of your ink. You can do this as much as you like. I like to test my color every 20 minutes or so to see how it’s progressing.  

  5. After 2-hrs, remove the liquid from the plant material. Scoop out the plant materials and dispose of it in the compost bin. Pour the liquid into one or two of your medium or large mason jars. 

  6. Place a funnel with a coffee filter on top of a mason jar or place a coffee filter over the mouth of your mason jar, with a rubber band securing it. You want to strain as much plant material out of the liquid. This usually takes at least two strains to accomplish. I prefer to set my mason jar over a paper towel/cloth on my kitchen table. I pour the ink slowly over top of the coffee filter and let it strain for about 20-30 minutes at a time – by that point the coffee filter should be free of liquid. You’ll need to replace your coffee filters as you go, a fresh filter speeds up the straining process and creates less mess in the longer run. Do this at least twice, by straining into one jar as you pour from the other. 

  7. Once your ink is strained and settled, I recommend adding in a few scoops of gum arabic powder or a few drops of the liquid. The powder takes some effort to mix into the ink. Mix until you no longer have large white clumps. Some residue is fine. Mixing can take around 10-20 minutes or so. 

  8. (Optional) It’s now mordant/modifier time! You can add alum to turn your ink into a bright yellow or add washing soda to make it a red-orange color. You only need a spoon-full of each mordant to radically change its color. I like to add 2-3 spoonfuls per ink jar. Sprinkle the mordant into your ink jar and mix it in well with a small metal spoon. Avoid getting any substances in your eyes or mouth, it can cause irritation. Keep away from food, pets and children while you're mordanting your ink. Washing soda will bubble up like a dropped soda can so be careful — things can get a little messy! Grab test strips of paper and try out how the ink looks on the paper. Add more mordant/modifier to see what happens. There is no “right” or “perfect” color outcome.

  9. If you like the color you have, finish the ink by adding clove buds (3-5) into the jar or (3-5) drops of wintergreen oil into the jar. This will preserve the ink and help keep it from growing mold. Handmade inks are living things, keep this in mind. They might change due to light, temperature conditions and age. If you see mold, remove it with a spoon or a paper towel. Mold usually sits on the surface. If I see mold forming, I’ll clean it away and then add in more preservatives. I re-jar my inks once a year, usually each fall when I’m in the midst of foraging and ink making season. This helps prolong the life and quality of the ink. 

  10. Label your ink (Name/Month/Year/Mordant/Modifier if used) and add it to your collection! I like to create an ink swatch at this time, on a spare piece of watercolor paper. I write down the same label details and brush ink across the paper. I add the swatch to my archive, to remember all the different types of ink I’ve made. It will also help you better understand how the inks react to time, light and air exposure. And now, your ink is ready for use!
Onion skins (left), avocado pits (center) and avocado skins (right)

Ink #2.JPG

Onion skins, avocado pits and avocado skins in pot simmering.

Filtering ink from the pot once the ink has cooled.

Testing color quality and mordant/modifier changes to inks.

Ink #3.JPG

Final ink color outcomes with modifiers added.